An 85-inch TV dominates a room, in the best way possible. But mounting something that weighs 100+ pounds and spans over seven feet requires more than enthusiasm and a drill. The wall has to carry the load. The mount needs proper backing. And the room layout has to work, or viewers end up with neck strain and awkward sightlines. This guide covers the structural requirements, design ideas, and practical solutions that make a wall-mounted 85-inch screen look intentional instead of improvised. Whether the goal is a sleek floating look or a built-in media wall, these strategies help homeowners get it right the first time.
Key Takeaways
- An 85-inch TV requires mounting into at least two to three studs, with lag bolts or toggle bolts rated for 100–130 pounds, making wall selection and structural verification critical before installation.
- Mount the TV with the center of the screen at eye level (42–50 inches from the floor), positioning the bottom edge around 20–30 inches up to avoid neck strain and achieve optimal viewing angles.
- Design an 85-inch TV wall with complementary accent ideas like shiplap, dark paint, stone veneer, or recessed lighting to integrate the screen intentionally rather than letting it dominate as a bare fixture.
- Use in-wall-rated cables (CL2 or CL3) or surface-mounted cable raceways painted to match the wall to hide cords professionally without visible spaghetti tangles.
- Position seating 7 to 10.5 feet from the screen for comfortable viewing, keeping viewers within 30 degrees off-center to avoid color distortion on LED and QLED panels.
- Install bias lighting with 6500K LED strips behind the TV and control ambient lighting with dimmers and adjustable fixtures to minimize glare and reduce eye fatigue during extended viewing.
Choosing the Perfect Wall for Your 85 Inch TV
Not every wall can safely hold an 85-inch television. Most models weigh between 100 and 130 pounds without the mount, and the VESA mounting pattern (the standardized hole spacing on the back) adds another 10–20 pounds of hardware.
Stud location matters first. An 85-inch TV mount needs to hit at least two 16-inch on-center studs, preferably three. Use a stud finder that detects the edges, not just the center, to confirm exact placement. If the wall is drywall over wood framing, lag bolts into studs provide the necessary shear strength. For metal studs, use toggle bolts rated for the combined weight or add a mounting board.
Exterior walls work better than interior partition walls for one reason: they’re often thicker and better braced. A load-bearing wall isn’t required, the load is lateral, not vertical, but a wall with solid framing and no plumbing or electrical runs simplifies installation.
Avoid mounting over a fireplace unless the unit is rated for heat exposure and the mantel height allows proper viewing angles. The center of the screen should sit at or slightly below eye level when seated, typically 42 to 50 inches from the floor. An 85-inch screen is roughly 42 inches tall, so the bottom edge should land around 20–30 inches up.
Check for HVAC ducts, wiring, or pipes before drilling. A bore scope or inspection camera (under $50) can peer inside the wall cavity if there’s doubt. If structural concerns exist, like older lathe-and-plaster walls or questionable framing, consult a contractor. This isn’t the project to wing.
Stylish Wall Mount Design Ideas for Large TVs
A naked 85-inch TV on a blank wall can look awkward, like a jumbotron in a living room. Thoughtful design helps the screen integrate rather than dominate.
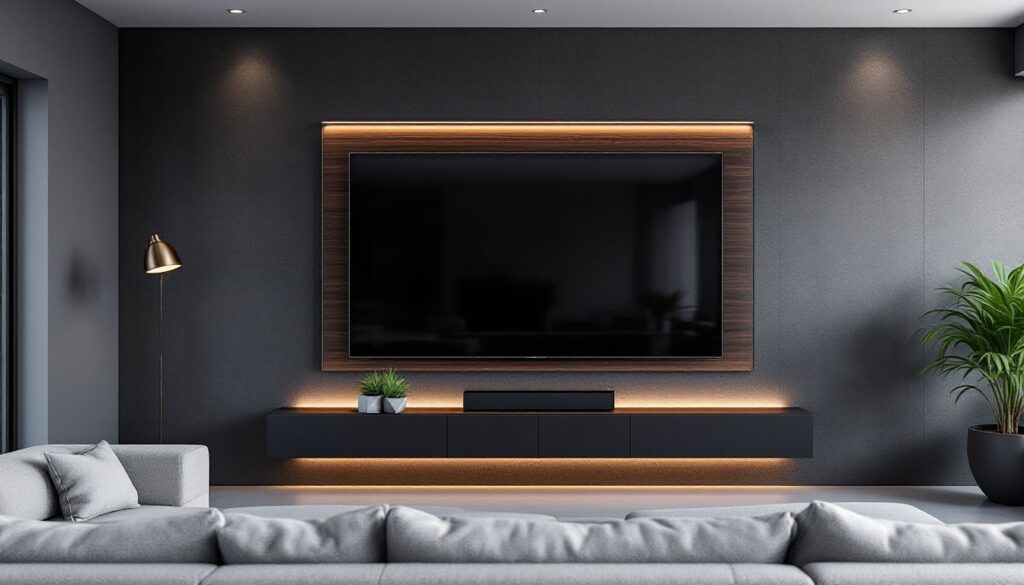
Full-motion articulating mounts offer flexibility for rooms where viewers sit in multiple spots, but they require deeper wall clearance (6–20 inches when extended) and stronger anchoring. Fixed low-profile mounts sit within 1–2 inches of the wall and work well for straight-on viewing. Tilting mounts adjust the vertical angle, useful if the screen sits higher than ideal or if there’s glare from windows.
For a more finished look, some homeowners build out the wall with a flush mount and drywall over it, leaving only a slim edge visible. This requires cutting a recess sized to the TV and mount assembly, framing it with 2x4s, and finishing the edges. It’s cleaner but less forgiving, once it’s drywalled, the TV position is permanent.
Framing and Accent Wall Concepts
A feature wall frames the screen without overwhelming it. Common approaches include:
- Horizontal wood planking (shiplap, tongue-and-groove, or 1×6 boards) in a contrasting stain or paint. Run them wall-to-wall or just behind the TV in a panel.
- Stone veneer or brick accent walls add texture but require a solid substrate. Real thin brick weighs 6–8 pounds per square foot: manufactured stone veneer runs lighter.
- Recessed wall niches with LED backlighting. Frame a shallow recess (3–6 inches deep) around the TV and line it with trim or floating shelves.
- Dark paint (charcoal, navy, deep green) behind the screen reduces reflections and creates a cinema effect. Matte or eggshell finishes work better than gloss.
Picture-frame mounts use snap-on magnetic frames or wood trim to border the TV like artwork. They suit lighter décor styles and Samsung’s Frame TV lineup, though aftermarket frames work with most flat screens.
Keep the scale in proportion. An 85-inch TV is already 74 inches wide, adding a heavy barn-wood frame or massive shelving can make the wall feel cluttered. Edit aggressively.
Cable Management Solutions That Look Professional
Visible cables wreck an otherwise clean install. Thankfully, there are multiple ways to hide them.
In-wall cable routing is the cleanest approach but requires cutting into drywall. Use a CL2- or CL3-rated in-wall rated cable kit that meets National Electrical Code (NEC) standards. Standard HDMI and power cables aren’t rated for in-wall use. If running power, install a recessed outlet (also called a recessed TV box) behind the screen location. This typically requires an electrician and a permit in most jurisdictions.
A simpler option: surface-mounted cable raceways or cord covers. Paintable PVC channels run vertically from the TV to a lower outlet or media console. They’re not invisible, but painted to match the wall, they’re unobtrusive. Stick with wider, flatter profiles (like Wiremold Corduct) rather than round tubing.
Power bridge kits (like PowerBridge or DataComm) let homeowners run power and AV cables between two electrical boxes without opening the wall extensively. They include a recessed kit with pass-through plates and meet code in most areas, though local rules vary.
If the TV sits on an accent wall with texture or paneling, cables can sometimes be routed behind the material. Shiplap, board-and-batten, or stone veneer installations naturally create a small gap.
For renters or those avoiding wall cuts, cord-hiding sleeves (fabric zip-up tubes) bundle cables together and can be painted or wrapped. They’re not as sleek, but they beat a spaghetti tangle.
Always leave service loops, a bit of extra cable slack, at both ends. TVs get replaced, mounts get adjusted, and tight cable runs create headaches later.
Furniture Arrangement and Room Layout Tips
An 85-inch TV dictates the room layout more than any other element. The viewing distance should be 7 to 10.5 feet for comfortable watching, based on THX and SMPTE recommendations. Closer than 7 feet can feel overwhelming: farther than 11 feet loses impact.
Position the primary seating (sofa, sectional, or recliners) directly opposite the screen. Avoid extreme side angles, anything beyond 30 degrees off-center creates noticeable color shift and distortion on LED and QLED panels.
Media consoles below the TV should span at least two-thirds the screen width, ideally 60 to 74 inches. This grounds the visual weight. Floating shelves or a low credenza work well if additional storage isn’t needed. Leave 4–6 inches of clearance between the console top and the TV’s bottom edge for visual breathing room.
For rooms with multiple seating zones, consider a swivel or articulating mount that rotates toward secondary seating. This works in open-concept layouts where the TV serves both a living area and a dining or kitchen zone.
Avoid placing the TV opposite large windows or glass doors without treatment. Even high-brightness screens (700+ nits) struggle with midday glare. Use blackout shades, solar shades, or curtains to manage light.
Traffic flow is often overlooked. Don’t mount the TV where people have to walk between the screen and seating constantly. In narrow rooms, consider mounting slightly off-center or angling furniture to preserve pathways.
Lighting Considerations for Wall-Mounted 85 Inch TVs
Lighting makes or breaks the viewing experience. Direct light hitting the screen creates glare, while too little ambient light causes eye strain.
Recessed can lights should never aim directly at the TV. Position them at least 3 feet in front of or behind the screen, or use adjustable trims to direct light away. If retrofitting isn’t an option, installing dimmer switches helps adjust brightness for daytime versus evening viewing.
Bias lighting, LED strips mounted behind the TV, reduces eye fatigue by providing a soft backlight. A 6500K color temperature (neutral white) works best, mimicking daylight without color cast. Stick LED tape (12V or 24V DC) to the back of the TV, not the wall, so it moves if the mount articulates. Keep brightness at 10–15% of the screen’s peak brightness.
Floor lamps and table lamps with adjustable heads let occupants control light direction. Avoid placing lamps directly beside the screen where they’ll cast reflections.
For dedicated home theater setups, consider sconces or wall-mounted fixtures on side walls that throw light upward or downward, keeping the screen zone darker. Pair this with blackout curtains or cellular shades rated for light blocking.
Never mount a TV in direct sunlight paths without window treatments. Even the best anti-glare coatings struggle with afternoon sun blasting a screen. South- and west-facing walls are the hardest to manage in this regard.
Conclusion
Mounting an 85-inch TV on the wall isn’t a casual afternoon project, but with the right prep, structural assessment, thoughtful design, and clean cable management, it transforms a room into a true entertainment hub. Focus on the details that matter: solid stud placement, appropriate viewing height, and lighting that doesn’t fight the screen. Done right, the result looks deliberate, not just big.