Converting an underutilized basement into a wine cellar isn’t just a luxury upgrade, it’s a practical way to protect an investment while adding real value to a home. Unlike makeshift kitchen racks or closet corners, a dedicated basement cellar offers the stable temperature, humidity control, and darkness that wine needs to age properly. Whether someone’s working with a sprawling walkout basement or a tight crawl space, the right design approach can turn square footage into a climate-controlled showcase. This guide walks through proven strategies, from traditional racking to modern glass walls, with the technical details needed to get it right the first time.
Key Takeaways
- Basement wine cellar ideas offer ideal storage conditions year-round, with naturally stable temperatures between 55°F and 65°F and humidity levels between 50% and 70% that protect bottles from oxidation and UV degradation.
- Choose between traditional designs with rich wood racking (redwood, mahogany) and modern minimalist solutions using steel, aluminum, or cable systems—both approaches must prioritize insulation and vapor barriers to maintain climate control.
- Under-stair wine nooks maximize unused basement space efficiently, requiring proper framing, R-15 to R-20 insulation, and ventilation to create a cost-effective storage solution for budget-conscious collectors.
- Install dedicated cooling units (through-wall or split systems costing $1,500 to $4,000) rather than standard HVAC, as wine cellars require precise temperature consistency that home comfort systems cannot deliver.
- Use only LED lighting with warm color temperatures (2700K-3000K) and avoid incandescent or halogen bulbs, which emit harmful UV radiation and heat that degrade wine over time.
- Invest in climate monitoring tools like hygrometers and humidifiers, properly sealed doors with weatherstripping, and consistent maintenance of structural foundations to create a functional cellar that protects your wine investment.
Why Your Basement Is the Perfect Wine Cellar Location
Basements naturally offer several conditions that align with wine storage fundamentals. The underground position buffers against temperature swings, most finished basements hover between 55°F and 65°F year-round without additional climate control, close to the ideal 55°F to 58°F range for long-term aging. Concrete foundation walls provide thermal mass that slows heat transfer, and below-grade spaces stay dark, protecting bottles from UV degradation.
Humidity levels in basements typically run higher than upper floors, which helps keep corks moist and prevents oxidation. Target humidity sits between 50% and 70%: too low and corks dry out, too high and labels deteriorate or mold appears. A basic hygrometer ($15–$30) confirms whether the space needs adjustment.
Structural advantages matter too. Basement floors, typically 4-inch poured concrete slabs over compacted gravel, easily support the weight of racking and bottles. A full wine rack holding 500 bottles can weigh 1,200+ pounds, so the solid footing beats second-story installations that might stress joists rated for 40 psf live load. For serious collectors planning floor-to-ceiling storage, verify the slab condition and consider a vapor barrier if moisture wicks through the concrete.
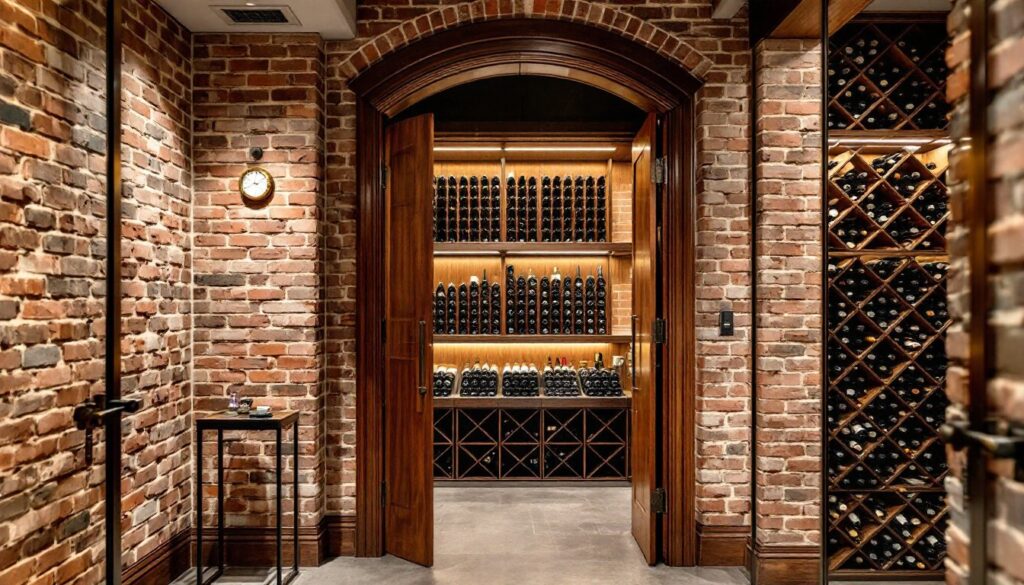
Traditional Wine Cellar Designs for Classic Elegance
Traditional cellars lean on rich wood tones, arched doorways, and modular racking that recalls European wine caves. Redwood, mahogany, and walnut remain popular for racking due to their rot resistance and visual warmth, though they carry premium price tags, expect $50–$100+ per linear foot for custom millwork.
Standard individual bottle racking uses diamond-bin or horizontal cradle configurations. Diamond bins store bottles at a 45-degree angle, while horizontal cradles keep corks submerged in wine. Spacing matters: allow 3.5 to 4 inches per bottle for Bordeaux-style bottles, more for Champagne or Pinot formats. Pre-fab modular kits (often pine with stain options) start around $300 for 72-bottle capacity and assemble with basic tools.
For an authentic look, some builders add stone or brick veneer to one accent wall, anchored to framed 2×4 stud walls with mortar or construction adhesive. This adds 15–20 pounds per square foot, so confirm the foundation can handle it. A wrought-iron or solid wood door with weatherstripping completes the sealed environment, critical for maintaining climate control. Glass inserts are fine if the cellar stays dark or uses UV-filtering glass.
Don’t skip the vapor barrier. Install 6-mil polyethylene sheeting on the warm side of insulated walls (between drywall and studs) to prevent condensation inside the wall cavity, which leads to mold and wood rot.
Modern Minimalist Wine Storage Solutions
Modern designs favor clean lines, metal-and-glass materials, and open display concepts. Powder-coated steel or aluminum racking offers durability without the maintenance wood requires, and it suits contemporary aesthetics with matte black, brushed nickel, or white finishes. Cable wine racks or acrylic peg systems mount directly to walls, creating a floating effect that works well in smaller basements where bulky furniture crowds the space.
Glass-walled cellars bring drama but demand precision. Use insulated tempered glass panels (dual-pane with low-E coating) to maintain thermal separation from adjacent rooms. Standard panels run ½-inch to ¾-inch thick: frameless installations require specialized door hardware with soft-close mechanisms to prevent bottle disturbance. Budget $150–$250 per square foot for materials and installation if going the glass route, and expect permitting in some jurisdictions since structural loads and moisture barriers come into play.
Wall-mounted metal grid systems (like those from industrial shelving suppliers) adapt easily to wine storage. Pair them with horizontal wooden dowels or acrylic pegs spaced at bottle width. This modular setup scales with a growing collection and costs a fraction of custom cabinetry, around $10–$20 per linear foot for raw materials.
Lighting in modern cellars leans toward LED strip lighting with dimmer controls and warm color temperatures (2700K to 3000K) to avoid harsh glare. Install strips along the top or bottom of racks, never aimed directly at bottles for extended periods.
Under-Stair Wine Nooks: Maximize Every Inch of Space
Basement staircases often leave a triangular void that’s awkward for storage but ideal for wine. The sloped ceiling naturally segments the space, and most under-stair areas stay cooler than open basement zones due to limited air circulation.
Start by measuring the headroom and depth. Typical basement stairs built to IRC code have a 7 ¾-inch max rise and 10-inch min tread, creating a wedge roughly 6 to 8 feet deep at the base. Frame out a small 2×4 closet with a solid-core door, add rigid foam insulation (R-15 to R-20) to interior walls, and seal gaps with spray foam to isolate the nook thermally.
Custom angled racking maximizes the sloped profile. Many DIYers build simple ladder-style racks using 1×4 or 1×6 pine boards with dowels or cut notches sized for bottles. Secure the frame to wall studs with 3-inch construction screws and level each shelf, bottles will roll if racks tilt. For collectors on a budget, repurposed terracotta pipe sections or PVC conduit cut into cradles work surprisingly well and cost under $30 for 50+ bottle capacity.
Ventilation remains key in enclosed nooks. Install a louvered vent or a passive return vent near the floor to let cool air circulate, or add a small through-wall fan tied to a humidistat if the nook runs warmer than the rest of the basement.
Climate Control and Insulation Essentials
Even naturally cool basements need help maintaining consistent conditions. Wine cellars require steady temperature (no more than a few degrees of fluctuation) and controlled humidity. A standard HVAC system can’t deliver this precision: it’s designed for comfort, not preservation.
Dedicated cooling units come in two formats: self-contained (through-wall) units and split systems. Through-wall models resemble window AC units, exhausting heat into an adjacent space. They’re easier to install, cut a hole in the wall, mount the unit, seal around it, but require an exhaust area that won’t overheat. Split systems place the condenser remotely (in a utility room or outside), keeping noise and heat away from the cellar. Expect $1,500 to $4,000 installed, depending on cellar size and unit capacity, typically measured in BTUs (a 500-bottle cellar needs roughly 2,500 to 4,000 BTUs).
Insulation standards should match or exceed exterior walls: R-19 in 2×6 stud bays for walls, R-30 to R-38 in any exposed ceiling. Use closed-cell spray foam around rim joists and penetrations to eliminate air leaks. Vapor barriers go on the warm side to stop moisture migration.
If the basement runs dry, add a small ultrasonic humidifier ($40–$80) with a built-in humidistat. Overly damp spaces need a dehumidifier, many basements already have one for general moisture control. Wire the cooling unit and humidity devices to a dedicated 15-amp circuit to avoid tripping breakers, and consult local electrical code (NEC Article 210) if adding outlets.
Safety note: Always wear safety glasses and a respirator when cutting or installing insulation, especially fiberglass or spray foam.
Lighting and Display Ideas to Showcase Your Collection
Wine hates UV light, so cellar lighting walks a fine line between showcasing bottles and protecting them. LED fixtures are non-negotiable, they emit virtually no UV, produce minimal heat, and last 25,000+ hours. Avoid incandescent and halogen bulbs, which generate heat and UV radiation that degrades wine over time.
Recessed canister lights with adjustable trims work well in finished ceilings, spaced every 4 to 6 feet for even coverage. Pair them with a dimmer switch to dial down intensity when the cellar isn’t in use. For racking, low-voltage LED strip lights (12V or 24V systems) install along shelf edges or under upper racks, highlighting labels without direct bottle exposure. Use warm white LEDs (2700K) to avoid the sterile look of daylight-temp bulbs.
Motion-sensor switches or timer controls ensure lights don’t stay on accidentally. Wire switches outside the cellar door so users can turn lights on before entering, reducing the chance of knocking bottles in the dark.
For display-focused designs, backlit glass shelving or illuminated bottle niches create dramatic focal points. Use frosted or textured glass to diffuse light and prevent hot spots. Mount shelves on adjustable brackets so the layout adapts as the collection grows.
Glass doors or interior windows between the cellar and an adjacent room (like a home bar or entertaining area) let guests admire the collection without entering. Ensure any glass is insulated and UV-filtering to maintain the thermal envelope.
Conclusion
Building a basement wine cellar combines carpentry, climate science, and a bit of patience, but the payoff is a functional space that protects bottles and impresses guests. Focus on the fundamentals first: insulation, vapor barriers, and reliable cooling. Aesthetic choices, racking style, lighting, finishes, matter, but they won’t save wine if the environment fluctuates. Whether someone’s framing out a compact under-stair nook or converting an entire room, the principles stay the same. Take accurate measurements, respect the science of wine storage, and don’t skip the unsexy stuff like weatherstripping and hygrometers. The result is a cellar that works as hard as it looks good.