A media wall isn’t just a spot to hang a TV, it’s the living room’s architectural centerpiece. Done right, it anchors the room, hides clutter, and solves layout problems in one shot. Whether someone’s working with a cramped apartment or a sprawling great room, a well-executed media wall turns dead space into a hardworking, good-looking feature. This guide covers practical designs that range from clean-lined minimalist setups to storage-packed built-ins and textured statement walls. Each idea includes real-world construction considerations, material choices, and lighting strategies that make the difference between a DIY win and a costly do-over.
Key Takeaways
- A media wall serves as an architectural centerpiece that hides cables, organizes electronics, and solves layout problems while providing a move-in-ready feature that appeals to home buyers.
- Minimalist media wall designs emphasize clean lines with flush-mounted panels, vertical slat walls, and floating consoles, requiring precision and anchoring to studs rather than drywall alone.
- Built-in storage solutions like floor-to-ceiling cabinetry, open cubby grids, and integrated media consoles require tight joinery using pocket-hole screws or dados to prevent sagging on units exceeding 48 inches.
- Textured finishes such as reclaimed wood, natural stone veneer, and three-dimensional panels add visual interest but demand surface prep and weight verification to ensure adequate wall bracing.
- Electric fireplaces integrated into media walls require dedicated circuits (120V or 240V), proper clearance to combustibles, and professional installation if running power behind the wall.
- Strategic LED lighting including bias strips, puck lights, and dimmable controls enhances texture, reduces eye strain, and creates a floating effect without causing screen glare.
What Is a Media Wall and Why Should You Have One?
A media wall is a dedicated vertical surface, often paneled, built-out, or finished with contrasting materials, designed to house a television and related electronics. Unlike a simple TV mount on drywall, a media wall integrates the screen into the room’s architecture through framing, cabinetry, shelving, or decorative cladding.
The functional benefits are straightforward. Cable management becomes invisible when wires run behind panels or through conduit. Component storage keeps gaming consoles, receivers, and remotes accessible but out of sight. Acoustic treatment improves when the wall includes sound-absorbing materials or speaker pockets. And for rooms with awkward layouts, offset windows, angled ceilings, or narrow walls, a media wall creates symmetry and focal point where none existed.
From a resale perspective, built-in media walls appeal to buyers who want move-in-ready spaces. Floating shelves and slat walls offer flexibility for renters or anyone who expects to reconfigure down the line. The key is matching the design to the room’s structural realities: stud spacing, electrical access, and load-bearing capacity all factor in before the first board goes up.
Modern Minimalist Media Wall Designs
Minimalist media walls strip away ornamentation and let materials do the talking. The result: clean lines, restrained color palettes, and an emphasis on proportion.
Flush-mount panels are the signature move. Instead of mounting a TV on drywall, builders frame out a shallow recess, typically 3½ inches deep to match standard 2×4 stud spacing, and finish it with smooth plywood or MDF. The TV sits nearly flush with the wall surface, and a single ½-inch reveal around the screen creates separation without bulk. Paint the recess a dark gray or matte black to reduce glare and make the screen disappear when it’s off.
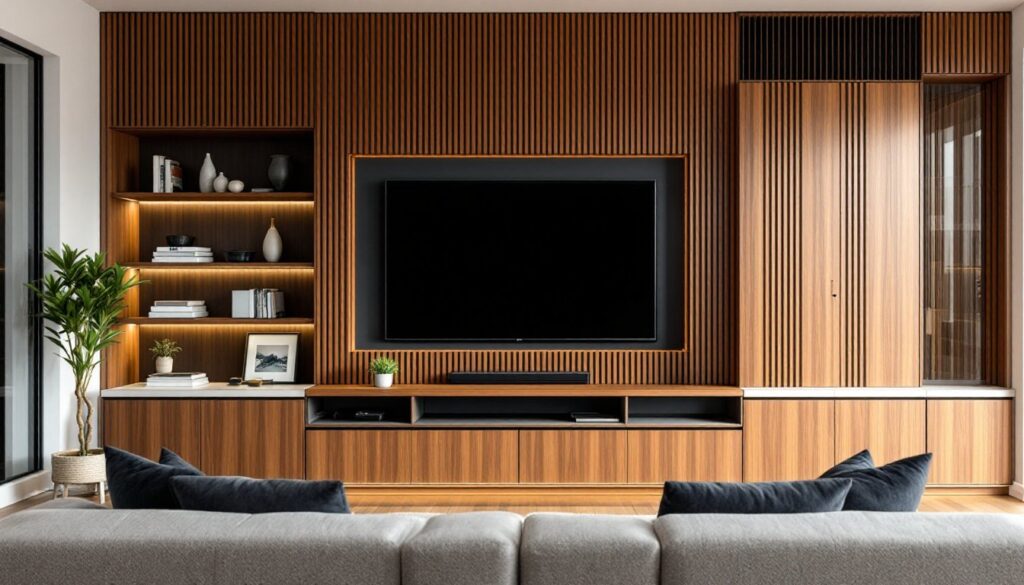
Vertical slat walls in walnut, white oak, or ¾-inch MDF strips add texture without pattern. Space slats 1 to 2 inches apart over a backing panel, running them floor to ceiling or just behind the TV zone. This treatment works especially well in rooms with low ceilings, vertical lines pull the eye upward.
Floating media consoles keep the floor clear and emphasize horizontal planes. Mount a 60- to 72-inch cabinet on a cleat system anchored into studs, leaving 12 to 18 inches of clearance below. Pair it with a wall-mounted TV centered above, keeping the bottom edge of the screen 42 to 48 inches off the floor for comfortable viewing from a standard sofa height.
Skip decorative molding, corbels, and anything with a profile deeper than ½ inch. Minimalism relies on precision, use a level religiously and countersink all fasteners.
Media Walls with Built-In Storage Solutions
Built-in storage turns a media wall into a room-organizing workhorse. The trade-off: more planning, more materials, and framers-square accuracy.
Floor-to-ceiling cabinetry flanking a central TV niche is the classic approach. Frame the unit with 2×4s on 16-inch centers, then face it with ¾-inch plywood or prefinished panels. Include adjustable shelving on shelf pins, ¼-inch holes drilled every 2 inches, so shelf heights can adapt to gear changes. Add soft-close hinges and push-latch doors to lower cabinets for a hardware-free look.
Open cubby grids offer visual breathing room. Build them as a 3×3 or 4×2 grid using ¾-inch hardwood plywood, with cubes sized 14 to 16 inches square. This scale fits vinyl records, gaming consoles, or a mix of books and decorative objects. Back each cube with ¼-inch plywood painted an accent color, or leave them open to the wall behind for a floating effect.
Integrated media consoles combine drawers, open shelves, and wire pass-throughs in one horizontal unit. Include a ventilated compartment for electronics, drill 1-inch holes in the back panel and add a 120mm USB-powered fan if heat buildup is a concern. Route power and HDMI cables through 2-inch grommets or brush-plate pass-throughs for a clean look.
Always account for actual lumber dimensions (a 2×4 is really 1½×3½ inches). Built-ins demand tight joinery, pocket-hole screws, biscuits, or dados beat butt joints every time. If the unit spans more than 48 inches, add a center support to prevent sagging.
Statement Media Walls with Textured Finishes
Texture transforms a flat wall into a tactile focal point. These finishes require surface prep and material know-how, but the payoff is a media wall that photographs like a showroom.
Three-dimensional wall panels, geometric tiles, wavy MDF, or faux stone, install over drywall with construction adhesive and finish nails. Panels typically come in 2×2-foot squares: plan the layout so seams land symmetrically around the TV. Paint them in a satin or matte sheen to emphasize shadows without glare.
Natural stone veneer or thin brick adds heft and warmth. Products like ledger stone or stacked slate are 1 to 2 inches thick and install with thinset mortar over cement board or directly on drywall if weight permits (check manufacturer specs). Grout lines should stay ⅜ to ½ inch wide, narrower looks forced. Seal porous stone with a penetrating sealer to prevent staining.
Reclaimed wood planks bring age and character. Source ¾-inch tongue-and-groove barn wood or pallet wood, but expect inconsistencies in width and straightness. Install planks horizontally with 18-gauge brad nails into studs or over ½-inch plywood backing. Sand any splinters and finish with matte polyurethane or leave raw for a rustier vibe, just know that unsealed wood will darken over time.
Venetian plaster or textured paint offers subtlety. Apply two coats with a trowel or hawk, varying pressure to create highs and lows. Topcoat with a flat sealer to lock in the finish and make it wipeable. This option works best on walls that are already smooth, patching and sanding come first.
Safety note: Stone and wood add weight. If the total load exceeds 15 pounds per square foot, verify that the wall is adequately braced and fastened into studs, not just drywall anchors.
Electric Fireplace Media Wall Combinations
Combining an electric fireplace with a media wall solves two problems: it adds warmth and fills the space below the TV with something more interesting than a blank console.
Recessed linear fireplaces are the go-to for modern builds. Models range from 36 to 72 inches wide and 6 to 12 inches deep, fitting neatly into a framed cavity between studs. Most require a dedicated 120V or 240V circuit (check the manual, some units draw 12 to 15 amps). Frame the opening ½ inch larger than the unit on all sides, finish with Type X drywall if local code requires fire-rated materials, and trim with metal or wood surrounds that maintain the required clearance to combustibles (usually 3 to 6 inches above the unit).
Mantel-style electric fireplaces suit traditional or transitional rooms. Install the firebox at floor level or raised 8 to 12 inches on a platform, then build a surround from MDF or solid wood with a 6- to 8-inch mantel shelf. Keep the TV bottom edge at least 12 inches above the mantel to maintain sightlines and avoid heat exposure, even though electric fireplaces emit far less heat than gas or wood units.
Wall-mounted fireplaces install like a large picture frame, mount the bracket into studs, hang the unit, and plug it in. This is the easiest route for renters or anyone avoiding major construction. Pair it with a floating shelf or slim console positioned just above or below the fireplace to balance the composition.
Wiring and ventilation: Most electric fireplaces need only a standard outlet, but running power behind the wall eliminates visible cords. Hire a licensed electrician if that work isn’t within comfort level, NEC-compliant in-wall wiring requires boxes and conduit, not extension cords stuffed behind drywall. Ventilation is minimal compared to gas units, but leave 2 to 3 inches of clearance on sides and top per manufacturer specs.
Lighting Ideas to Enhance Your Media Wall
Lighting defines edges, highlights texture, and reduces eye strain during movie marathons. But overlighting a media wall creates glare, subtlety wins.
LED strip lighting behind panels or shelves produces a floating effect. Use 3000K warm white or RGB strips with a dimmer or smart controller. Mount strips along the top and bottom edges of a recessed panel or along the back of a floating console, spacing them 1 to 2 inches from the wall to cast an even glow. Avoid placing strips where they’ll reflect on the TV screen.
Recessed puck lights or track lighting accent shelves or artwork flanking the TV. Install 3-inch LED downlights in a soffit or ceiling, angled 30 to 45 degrees to graze textured surfaces. Use adjustable-trim fixtures so the light direction can be tweaked after installation.
In-cabinet lighting makes open shelving pop. Battery-powered puck lights work for renters, but hardwired low-voltage LED strips offer cleaner lines and no battery swaps. Wire them to a wall switch or motion sensor for hands-free control.
Bias lighting behind the TV reduces eye strain by softening the contrast between a bright screen and a dark wall. Mount a 6500K LED strip along the back edge of the TV, it’s functional, not decorative, and shouldn’t be visible from the front.
Dimmer switches are non-negotiable. Even the best lighting scheme fails if brightness can’t adapt to the time of day or the content on screen. Install electronic low-voltage dimmers compatible with LED loads, standard incandescent dimmers cause flickering.
Safety and code: Any wiring inside walls or ceilings must meet NEC standards. Use UL-listed fixtures and drivers, and if in doubt, call an electrician. DIY lighting is legal and common, but shoddy wiring is a fire risk and an insurance liability.
Conclusion
A media wall rewards planning and precision. Measure twice, frame square, and think through cable routing before the first screw goes in. Whether the goal is minimalist elegance, storage-packed utility, or textured drama, the principles stay consistent: use real dimensions, anchor to studs, and don’t skip the finish details. With the right approach, a media wall becomes the room’s hardest-working feature, and the one guests notice first.